
| 일 | 월 | 화 | 수 | 목 | 금 | 토 |
|---|---|---|---|---|---|---|
| 1 | 2 | 3 | 4 | 5 | ||
| 6 | 7 | 8 | 9 | 10 | 11 | 12 |
| 13 | 14 | 15 | 16 | 17 | 18 | 19 |
| 20 | 21 | 22 | 23 | 24 | 25 | 26 |
| 27 | 28 | 29 | 30 |
Tags
- 3유형
- streamlit
- webserving
- 2유형
- 빅데이터분석기사
- 성능
- QGIS설치
- 실기
- DASH
- Kaggle
- pytorch
- 딥러닝
- 1유형
- ml 웹서빙
- 공간분석
- 공간시각화
- CUDA
- GPU
- K최근접이웃
- KNN
- dl
- ㅂ
- qgis
- fastapi
- 인공지능
- 머신러닝
- gradio
- 캐글
- 예제소스
- Ai
Archives
- Today
- Total
에코프로.AI
[Python] CNN 구현 (Feat. Tensorflow) 본문
Tensorflow의 CNN(Convolution Neural Network) 모델을 이용해서, 강아지,고양이 이미지를 학습 후, 분류하는 모델을 만들어 보겠습니다.
기본설정
- 파이썬 기본라이브러리 불러오기
import pandas as pd
import numpy as np

import matplotlib.pyplot as plt- 구글 드라이브 연동
colab에서 작성되었으며, 이미지는 구글드라이브에서 가져와서 학습한다.
# 구글 드라이브 마운트
from google.colab import drive
drive.mount('/content/drive')
# 나의 루트 경로 설정
rootdir = '/content/drive/MyDrive/Colab Notebooks/ML'
- 독립변수(x_data), 종속변수(y_data) 불러오기
import glob                 # 파일 경로 및 이름 패턴을 다루기 위해 glob 라이브러리를 임포트
from PIL import Image       # 이미지 파일을 처리하기 위해 Pillow 라이브러리의 Image 모듈 임포트

x_data = []
y_data = []

for img_name in glob.glob(rootdir + '/dog_cat/img' + '/*.jpg'):
  print(img_name)

  img = Image.open(img_name)
  img = img.resize((200, 200))                # 이미지 사이즈 조정
  nd_img = np.array(img)
  x_data.append(nd_img)


  # 라벨값 설정 (파일이름이 dog으로 시작하면 = 0, 아니면 1로 설정)
  # img_name
  # /content/drive/MyDrive/Colab Notebooks/빅데이터분석과정/20240821_파이썬_딥러닝_한상훈/dog_cat/img/dog_0.jpg
  if (img_name.split('/')[-1].startswith('dog')):
    y_data.append(0)
  else:
    y_data.append(1)

  # print(nd_img[0])
  # print(nd_img.shape)

  if (np.random.choice(100, 1) < 5):
    plt.imshow(nd_img)
    plt.show()

x_data = np.array(x_data)
y_data = np.array(y_data)
print(x_data.shape, y_data.shape)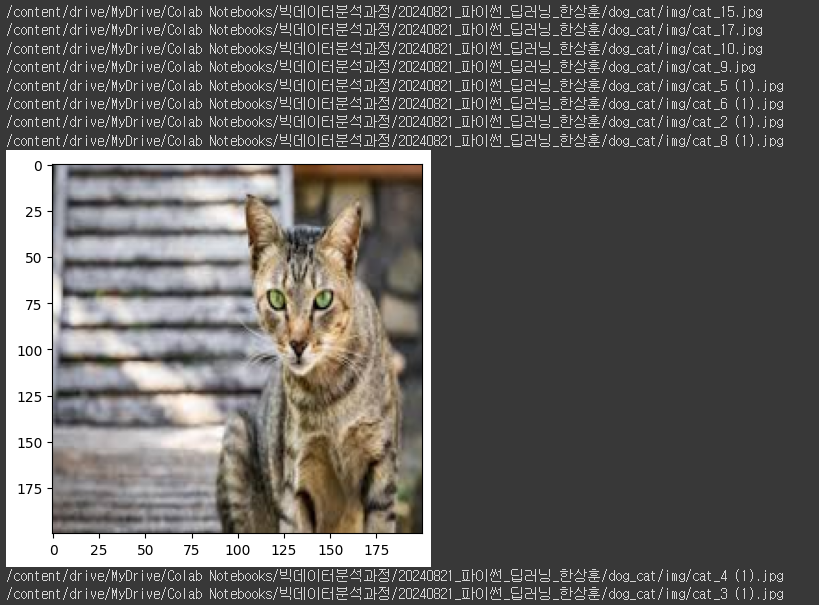
데이터 전처리
x_data.shape, y_data.shape
np.unique(y_data)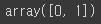
0 : 강아지 이미지 147개
1 : 고양이 이미지 91개
pd.Series(y_data).value_counts()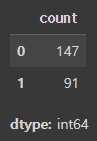
- 데이터 분리
from sklearn.model_selection import train_test_split

X_train, X_test, y_train, y_test = train_test_split(x_data, y_data, test_size = 0.2, stratify= y_data, random_state = 42)
X_train.shape, X_test.shape, y_train.shape, y_test.shape
- 독립변수 - 차원축소
DNN에서는 Input을 1차원 배열로 입력을 해줘야 해서, 차원축소가 필요했으나,
CNN은 별도의 차원축소는 필요없음
# x_train_1d = X_train.reshape(-1, 10000, 3)
# x_test_1d = X_test.reshape(-1, 10000, 3)

x_train_1d = X_train
x_test_1d = X_test

x_train_1d.shape, x_test_1d.shape
- 독립변수 - 스케일 조정
# 0 ~ 255 까지 스케일
x_train_1d = x_train_1d / 255.0
x_test_1d = x_test_1d / 255.0
- 종속변수 - 원핫인코딩
print(np.unique(y_train))
print(np.unique(y_test))
from tensorflow.keras.utils import to_categorical

y_train_enc = to_categorical(y_train)
y_test_enc = to_categorical(y_test)

y_train_enc.shape, y_test_enc.shape
print(y_train[:5])
print(y_train_enc[:5])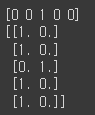
모델링
from tensorflow.keras.models import Sequential
from tensorflow.keras.layers import Input, Conv2D, MaxPool2D, Flatten, Dense, Dropout
from keras.optimizers import RMSprop

model = Sequential()
model.add(Input(shape = (200, 200, 3)))       # 가로(200 pixel) * 세로(200 pixel) * 컬러(3 - RGB)

# (5*5)*1*32 + 32
model.add(Conv2D(filters = 32, kernel_size = (5, 5), activation='relu'))
model.add(Dropout(0.5))
model.add(MaxPool2D(pool_size = (2, 2)))

# (5*5)*32*64 + 64
model.add(Conv2D(filters = 64, kernel_size = (5, 5), padding = 'same', activation='relu'))
model.add(Dropout(0.5))
model.add(MaxPool2D(pool_size = (2, 2)))

# (7*7)*64*64 + 64
model.add(Conv2D(filters = 64, kernel_size = (7, 7), padding = 'same', activation='relu'))
model.add(Dropout(0.5))
model.add(MaxPool2D(pool_size = (2, 2)))

model.add(Flatten())      # 평면화 작업 - 1차원 벡터로 변환
model.add(Dropout(0.5))
model.add(Dense(2, activation = 'softmax'))
model.summary()

model.compile(loss = 'categorical_crossentropy', optimizer = 'adam', metrics = ['accuracy'])
from tensorflow.keras.callbacks import EarlyStopping, ModelCheckpoint
esc = EarlyStopping(monitor = 'val_loss', patience = 10)
chk = ModelCheckpoint(filepath = rootdir + '/dog_cat' + '/c_n_d.keras', monitor = 'val_loss', save_best_only = True)
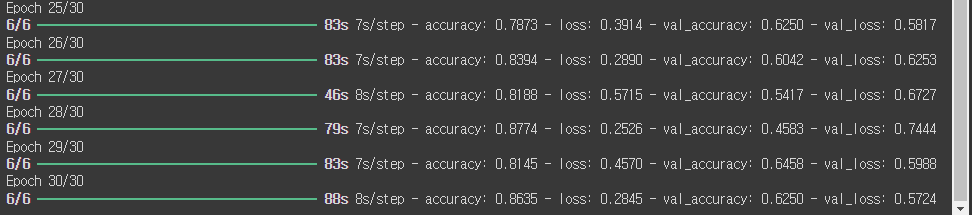
hist = model.fit(x_train_1d, y_train_enc, epochs = 30, validation_data = (x_test_1d, y_test_enc), callbacks=[esc, chk])
정확도(Accuracy) / 손실(loss) 확인
def train_report(hist):
  fig, axs = plt.subplots(nrows = 1, ncols = 2, layout = 'tight', figsize = (7, 3))

  for i, mt in enumerate(['accuracy', 'val_accuracy', 'loss', 'val_loss']):
    if i % 2 == 0:
        axs.flat[i//2].set_title(mt)
    axs.flat[i//2].plot(range(len(hist.history[mt])), hist.history[mt], label = mt)
    #axs.flat[i/2].imshow(x_train[i], cmap = 'Greys')
    #axs.flat[i].set_axis_off()
  plt.show()
train_report(hist)
모델 예측하기
# predict 매개변수는 2차원의 데이터를 넣어야 됨.
pred = model.predict(x_train_1d[:1])
print(pred)
print(np.sum(pred))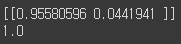
모델 가져오기
from tensorflow.keras.models import load_model

c_n_d_model = load_model(rootdir + '/dog_cat' + '/c_n_d.keras')
c_n_d_model.summary()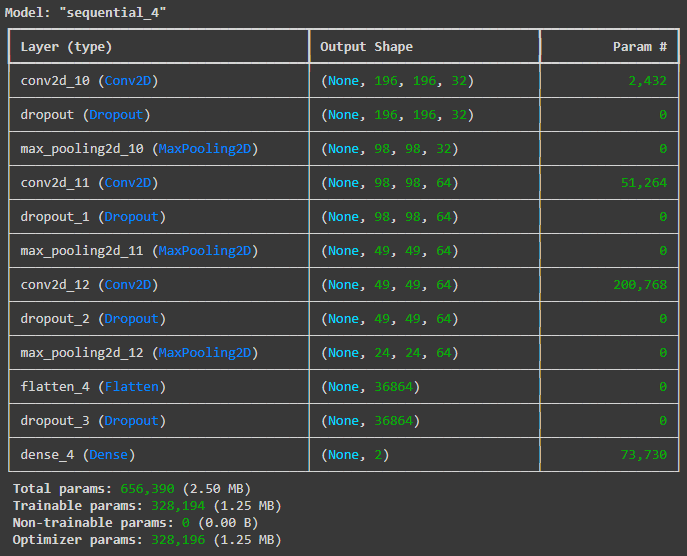
# c_n_d_model.predict(x_test_1d)
np.argmax(c_n_d_model.predict(x_test_1d), axis = 1)
예측함수 작성
def img_pred(model, f_name):

  # 이미지 불러오기
  img_name = glob.glob(rootdir + '/dog_cat/img' + '/' + f_name + '.jpg')[0]

  img = Image.open(img_name)
  img = img.resize((200, 200))                # 이미지 사이즈 조정
  nd_img = np.array(img)

  # 이미지 출력 (cmap='Greys' 흑백출력)
  plt.gca().grid(False)
  plt.imshow(nd_img, cmap= plt.cm.binary)

  # 예측하기
  pred = model.predict(nd_img.reshape(-1, 200, 200, 3))
  print('예측값 : ', np.argmax(pred, axis = 1), ', pred : ', pred)
  print("예측 : 고양이" if (np.argmax(pred, axis = 1) == 1) else "예측 : 강아지")
img_pred(c_n_d_model, 'dog_1')
# img_pred(c_n_d_model, 'cat_80')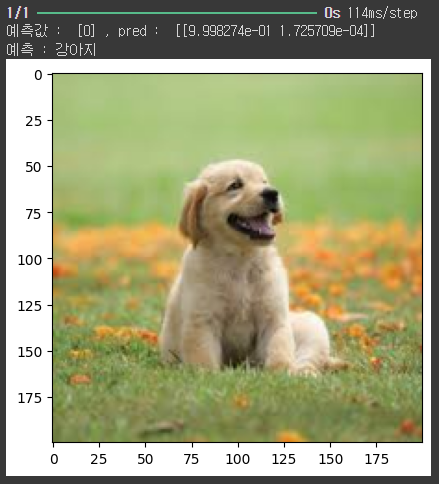
'AI Tutorial' 카테고리의 다른 글
| [Python] 오토인코더(AutoEncoder) 설명 및 코드구현 (Feat. Tensorflow) (1) | 2024.08.28 |
|---|---|
| [Python] RNN 구현 (Feat. Tensorflow) (0) | 2024.08.28 |
| [머신러닝] RNN(Recurrent Neural Network) (0) | 2024.08.26 |
| [머신러닝] CNN(Convolutional Neural Network) (0) | 2024.08.23 |
| [Python] 크롤링 (Feat. 구글 이미지 저장) (0) | 2024.08.23 |
'AI Tutorial' Related Articles
more


